
May 06, 2011
MOVED
SUP. So I managed the move! More details over at cathlinargbakes.tumblr.com!
Continue reading...
May 04, 2011
Moving...?
I hope, anyway.
I've been chillin' on Tumblr for a while now, doing some other things that have failed - whatever. I found a script to move Blogger posts to Tumblr and I'm hoping that it'll be back up and running soon, so I can move my content over. Then I'm hoping I can revive this blog a bit, because I really truly miss it!
I'll post an address for you to find me, if you're still interested, once I get things back up and running!
I'm sorry I've been so absent, but I hope some of you will stick around to see what's next. :) Continue reading...
June 01, 2010
Perfect Vanilla Cupcakes

It's been a long long time. I didn't intend to be away from this blog for so long. But I had the end of my undergraduate classes, exams, we moved, I've been looking for apartments in Vancouver, I've been keeping up my photography blog which can be quite a task, and I just haven't really been baking much, not least of all because I moved all my baking stuff home. I'm finally here though to talk about my birthday cupcakes… even though my birthday was now over two months ago.

Like most cakes, you begin with the dry ingredients.
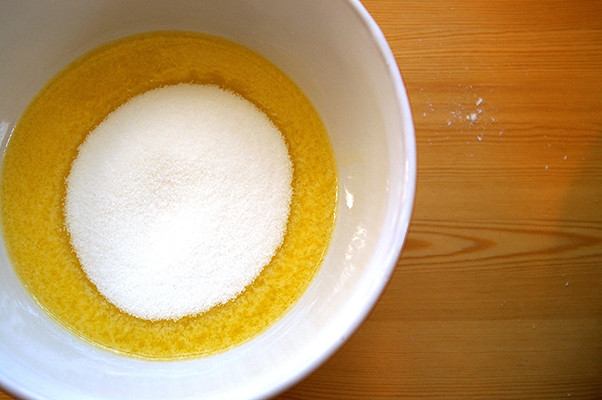
And then mix together the wet ingredients, along with the sugar...
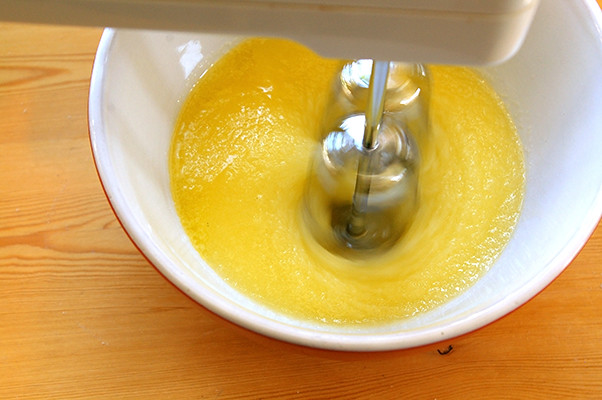
and beat it up.
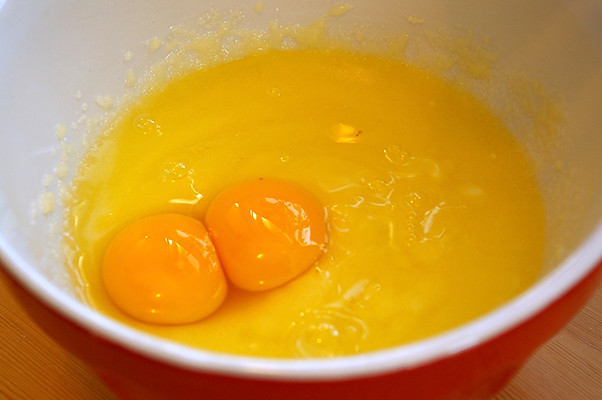
Add the eggs...
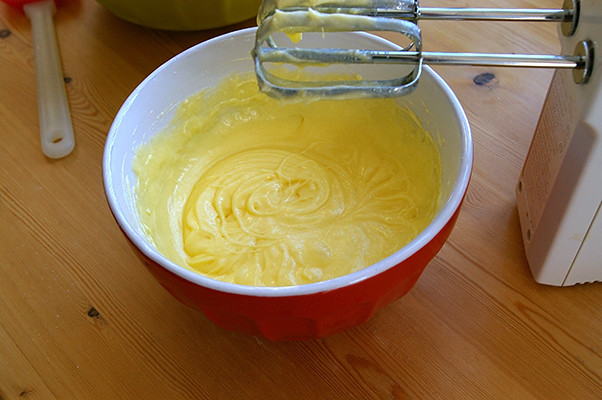
and beat it up again, until it becomes fluffy and pale yellow.

Then add some vanilla and mix it gently.
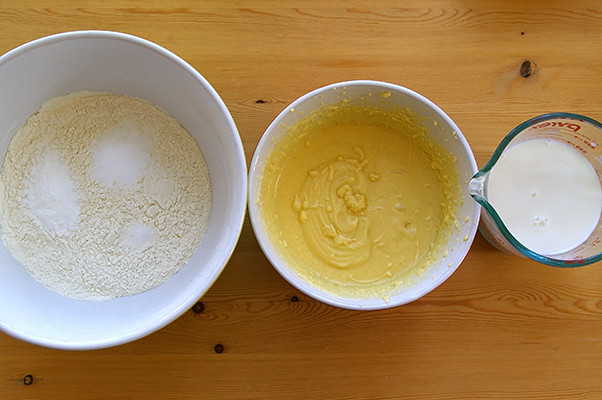
The other liquid this recipe calls for is buttermilk, but you can achieve the same effect as buttermilk by mixing milk with vinegar, which is what I did here. And so you have three bowls of different ingredients.
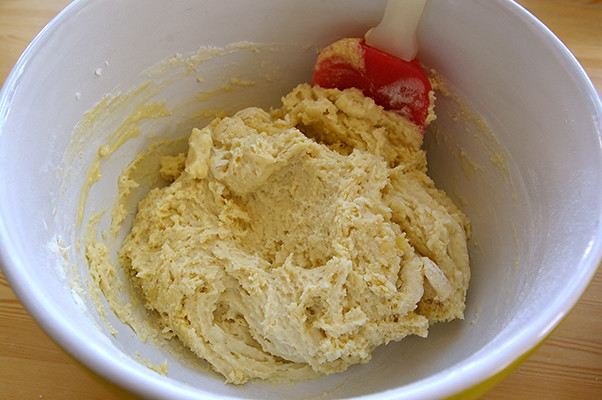
Add half of each type of wet ingredients and mix.

Mix in the remaining wet ingredients and whisk to smooth out any very large unmixed bits.
Now, of course I forgot to take a photo, but either pour the batter into a greased and floured cake tin, or line a muffin tin with papers and scoop the batter into each cup.
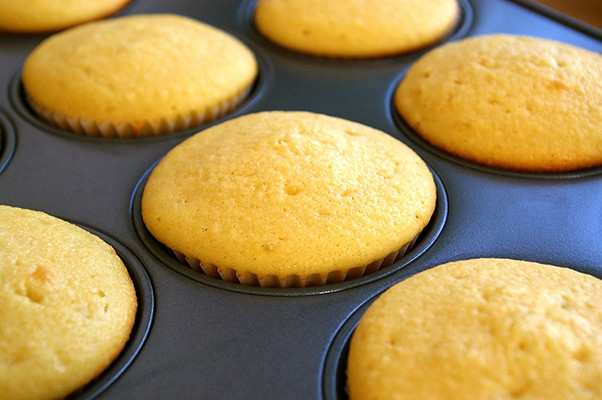
After baking for 15-20 minutes (sorry, I know I made notes on this, but I can't find them!), they come out smelling delicious and looking beautifully golden.
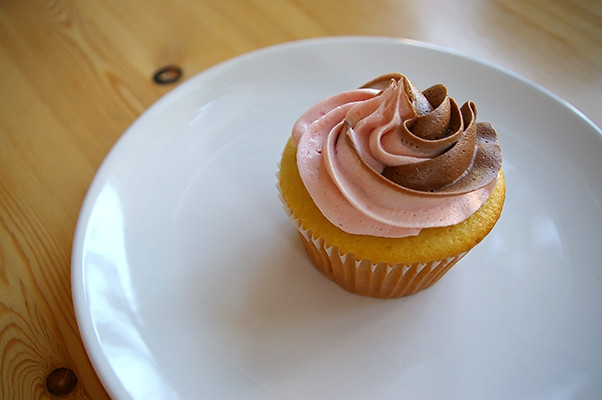
You can frost or decorate them however you want. I chose to make a chocolate and a strawberry buttercream and pipe them together onto the cupcakes.
These are the bessst vanilla cupcakes I've ever found a recipe for. I also used this as a cake once, if you'll remember Anders' 23rd birthday track cake. It's such a tasty, perfect recipe - not dense, not too sweet, soft, and just… delicious! Definitely give it a try next time you're in the market for a vanilla cake!
Recipe
Vanilla Cake
1 ¼ cups all-purpose flour
½ teaspoon baking powder
½ teaspoon baking soda
½ teaspoon salt
6 tablespoons butter, melted
1 cup granulated sugar
1 egg, room temperature
1 teaspoon vanilla extract
1 cup buttermilk, plain yoghurt, or sour cream
Preheat oven to 350°F. Grease and lightly flour a 9x9/9x13 cake pan. Sift together flour, baking powder, baking soda, and salt; set aside. In a large bowl, beat together melted butter and sugar until completely combined. Add eggs and beat until mixture is smooth and light. Stir in vanilla extract. Add flour mixture in two additions, alternating with buttermilk. Pour batter into prepared pan. Bake for 30-35 minutes (cake) or 15-20 minutes (cupcakes), until cake is barely golden and a toothpick inserted in the centre comes out with only a few loose crumbs.
Guten Appetit! Continue reading...
March 26, 2010
Black Beans and Rice

I know I said I'd be back to post about my birthday cupcakes, but I actually have this delicious black bean and rice dish banked, and if I don't post about it now, I know I'll forget and it will never happen. But don't worry! The cupcakes are coming! And you're not losing anything by getting this post first. In fact you're gaining because this dish is delicioussss! And really quick and simple! It's also versatile.

The real fun starts with what I call the "dressing." In a large bowl you combine olive oil, lime (or lemon) juice, chili powder, ground cumin, turmeric, crushed garlic, salt, pepper and a can of green chilies. We use mild chilies because we don't like spicy food that much, but you can use any kind of green chilies, depending on how spicy you like your food!
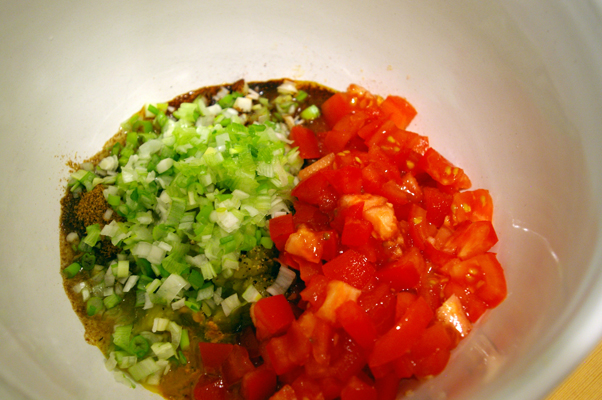
Add in some chopped green onions and tomato...
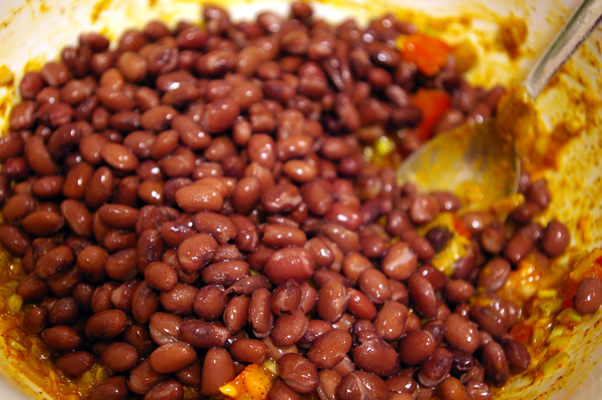
and a can of black beans (rinsed thoroughly first, of course!).
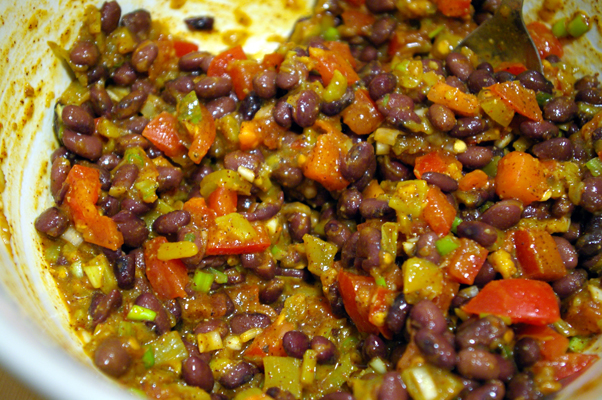
Give it a good stir and wait for your rice to finish.
Then throw your rice in (we like basmati), mix it up well, again, and serve!
It's really that simple. Now, you may be wondering how you serve this dish. Well, as I said, it's versatile! The recipe is originally a wrap filling. Whip up some guacamole and your own tortillas, if you're feeling ambitious, chop up some lettuce and cheese and you've got yourself some delicious and healthy wraps. I've also baked this, with cheese on top! I've also stuffed peppers with it and baked them in the oven! But normally, we just eat it as a side dish with some form of protein (meat for Anders, vegetarian hot dogs for me, usually), and some cooked vegetables! It's really very tasty and when you can use it for so many things, you can't really go wrong! It keeps well in the fridge and makes a great quick snack as leftovers.
Now, before I move on to the recipe, I wanted to give myself a little shameless plug. I'm starting a very long photography project tomorrow, and while I don't know how many people actually read this blog regularly, I thought I'd plug it here, in case anyone who does read it is interested! There's nothing up there, now. My first post will appear at 12AM, eastern time. Thanks!
Recipe
Black Beans and Rice
1 cup dry rice, cooked
1-2 tablespoons olive oil
2 tablespoons lime (or lemon) juice
2 teaspoons chili powder
1 teaspoon cumin
1/2 teaspoon turmeric
1 medium clove garlic, crushed
salt and pepper to taste
1 can (114 ml) (mild) green chilies
1 cup tomato, chopped
6 green onions, diced
1 can (540 ml) black beans, drained and well rinsed
Cook rice and set aside. Meanwhile, in a large bowl combine the remaining ingredients. Add cooked rice and mix well. Serve as a side dish, baked with cheese on top, or stuffed in peppers.
Guten Appetit! Continue reading...
March 13, 2010
Cake Mix Cookies

I am fo' realz back, only ten days after my last post. BAM. And I have these really easy and tasty cookies to share. All you need is a box of cake mix (any flavour), vegetable oil, eggs, chocolate chips and some oats, if you want. A bowl is probably good, too.

Start simple: beat some eggs.

Throw your cake mix and some oats, if you want them, into a bowl.

toss in the eggs, oil and chocolate chips.

Stiiiir it up, little darlin'.
I missed taking a photo of this but scoop the batter into about 2-tablespoon-sized balls and put them on a baking tray. Then bake them.

They will look and smell delicious when they come out of the oven.

These were the last three cookies left... about 36 hours after I had baked them.
Recipe
Cake Mix Cookies
1 boxed cake mix (any flavour)
¾ cup rolled oats (optional)
2 eggs, lightly beaten
½ cup oil
¾ cup semi-sweet chocolate chips
Preheat the oven to 350°F. In a large bowl combine all ingredients, mixing well. Spoon batter in about 2-tablespoon-sized balls and place on a baking tray. Bake in preheated oven for 10-12 minutes. Cool briefly on trays before removing to wire rack to cool completely.
Guten Appetit! Continue reading...
March 03, 2010
Anders' 23rd birthday cake and a tasty version of Wilton's buttercream frosting
I have no excuses for how long I've left this blog, except to say that, while I love cooking and baking, I haven't been feeling the urge to do it that often recently. Also, I've been trying to get back into shape after hardly being able to exercise at all for about four months, and eating homemade baked goods doesn't fit into that plan very seamlessly.
Nevertheless, I am here to report on the birthday cake I made for Anders this year! The photo above is just a teaser...
OK... so I really wanted to document this whole process with photos, but there were a couple factors involved in my failure to do that. 1) I was a nervous WRECK because I was, with the help of some friends and the cooperation of the entire cross-country/distance track team, planning and trying desperately to pull off a surprise party for Anders, so I was really busy, and 2) I'm out of practice so I just... forgot. See, I finally found this amazing recipe for a classic vanilla, yellow cake, which I used, and I wanted so badly to share it with everyone. And I will! My birthday is two weeks from tomorrow, and I'm planning on making cupcakes with this recipe for my classes (because I'm 22 going on 7 apparently), so I will post it then! I promise!
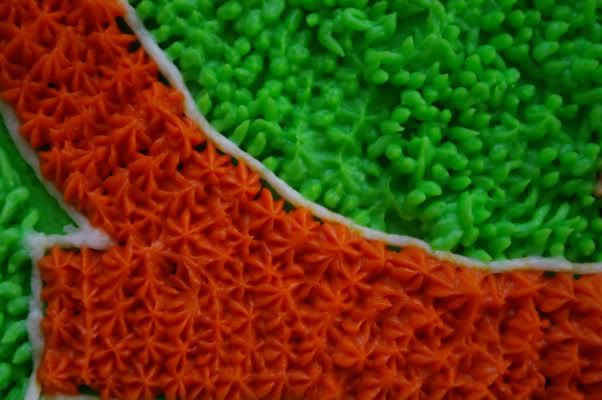
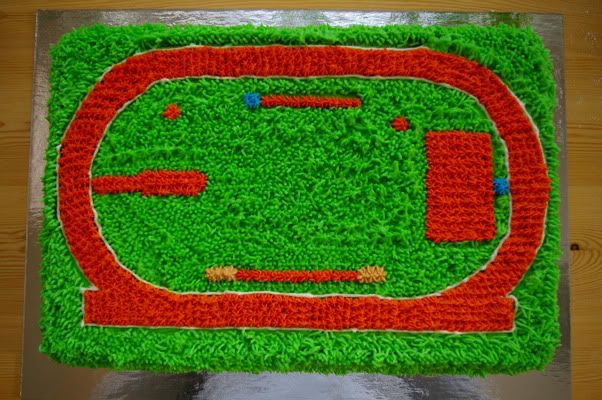
So what is this post all about then, if not a super awesome recipe for yellow cake? Well, this year was the first time I ever tried to do anything fun with Anders' birthday cake. I decided to make a 9x13 sheet cake and FROST A TRACK ONTO IT.
BAM.
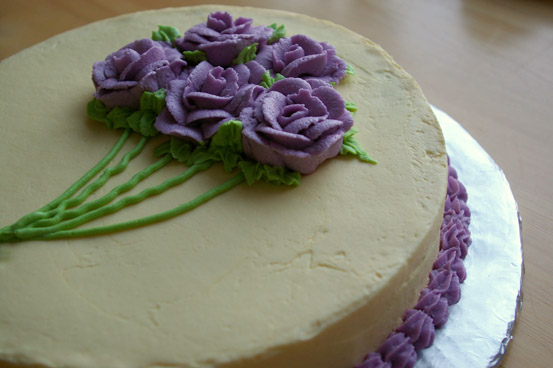
Anders' birthday tends to fall right around the middle of indoor track season for Canadian universities, and most (if not all) of our friends are runners, so I thought it was appropriate. I went out and bought the pan specically for it. I also bought Wilton frosting tip #233 to make real-looking grass AROUND the track. Want to see a detail photo of that?

BAM.
It was a lot of fun to do! The only problem was that I kept melting the frosting in my hands, which is why you can see spots where the frosting is just a big blob on the cake... See, I had to keep a desk lamp out in the kitchen so I could see my colours properly and make sure they were mixing correctly. Plus my hands were flippin' hot from being so nervous. It wasn't a great combination. But everyone was really impressed and even though when I look at the photos now I think "it looks like a 12 year-old frosted that cake..." I'm pleased with how it turned out and how happy Anders was with it, and how much everyone at the party liked it.
Also, if you look at it from an artsy angle and kind of unfocus the one end (as if you're a camera lens.........) it looks way better.

BAM.
Seriously, though. I'm sorry I was away for so long. I made cookies a couple of days ago so I'll post those soon, and I promise I'll make delicious cupcakes and post about those too in the next couple of weeks. So there are a few things to look forward to in the near future!
Oh, and in case you're wondering, I used the Wilton buttercream frosting recipe to frost this cake. I've posted about this recipe before, and you can find that here. But here's the thing: that recipe, as it is, is disgusting. So here's how I ACTUALLY make my version of the Wilton buttercream frosting.
Recipe
Buttercream Frosting
1 cup unsalted butter, softened
2 teaspoons vanilla
3 tablespoons milk or water
4 cups confectioners' sugar
1 tablespoon meringue powder
pinch of salt (optional)
Cream together butter, vanilla, milk/water and salt if using (it's good to dissolve the salt in the liquid, otherwise it might dissolve later in your frosting and mess up the colours). Add confectioners' sugar 1 cup at a time, mixing well at medium speed after each addition. Add the meringue powder with one of the cups of sugar, and continue mixing on medium speed until all ingredients have been thoroughly mixed together. Mix for an additional minute or so, until creamy.
This recipe makes about three cups of stiff consistency frosting. Wilton has three consistencies they use in class and it's actually pretty useful to know them and what they're used for.
Stiff consistency is used for things like flowers with upright petals, like the Wilton rose or sweet peas.
Medium consistency is used for stars (with the star tips), figure piping, borders (like the shell border) and flowers with petals that lie flat. To make medium consistency frosting, add one teaspoon of water for each cup of stiff frosting, or one tablespoon if you want to make the full recipe medium consistency.
Thin consistency is used for writing, making vines, leaves and frosting the cake. To make thin consistency frosting, add two teaspoons of water for each cup of stiff frosting, or two tablespoons for the full recipe.
Guten Appetit! Continue reading...
November 23, 2009
Canadian Thanksgiving... over a month late
I'm sorry it's been so long. This semester has been riddled with bad luck accompanied by stress. First I found a member of my family is very ill, then I fell off a horse and injured my tail bone and hip, then I pinched my sciatic nerve as a result of limping from the injured hip, as soon as that got better I rolled my ankle really badly and sprained it, and that only really started getting better a few weeks ago, and last week I had the worst cold I've had in years which kept me in bed for days straight. And through all that I either haven't felt like or haven't been able to bake or cook much out of the ordinary, day-to-day sustenance.
But Anders and I did make a small Thanksgiving dinner together and I took photos. We had been at my cousin's wedding the day before and neither of us were able to spend Thanksgiving day with out families, so we made a small dinner together. Now, Canadian Thanksgiving was over a month ago, but since American Thanksgiving is coming up, I thought I'd finally post about it!
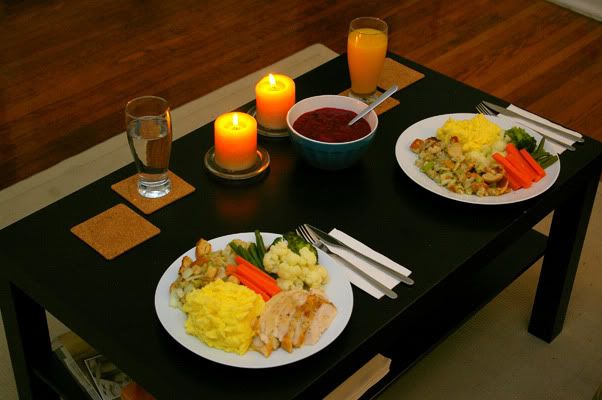
Here's what our little table looked like. Delicious!
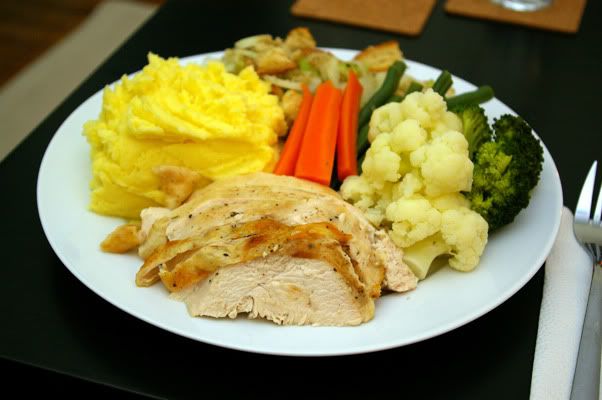
This is Anders' plate, complete with turkey (I don't eat meat).
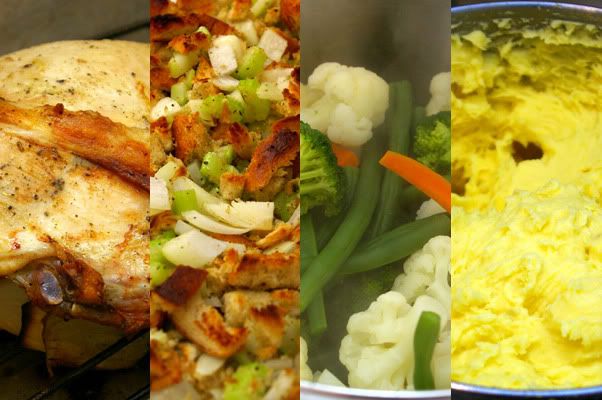
I didn't really use recipes for any of this. For the turkey breast, I made a rub with softened butter, salt, pepper, and poultry seasoning. Then I rubbed it all over the breast and under the skin. I put a large piece of onion in the small "cavity" created by the ribs on the underside of the breast and put it in the oven for about an hour.
For the dressing we tore up rye bread, tossed it with celery, onions, salt, pepper, poultry seasoning and olive oil. Neither Anders nor I like mushy stuffing cooked inside the bird (especially me... since I don't eat meat), so we baked it in a dish until it got crispy and tasssty.
Steamed vegetables and a mashed potatoes are pretty straightforward, so I don't think I need to explain that, right? The only thing I will say is that for mashed potatoes, Yukon Golds are GREAT. I also find that it works best to mash the potatoes with a masher first, then add in milk and (lots of) butter and whip the whole thing with a mixer. It makes for very smooth and tasty mashed potatoes!
The dinner was really great, except that the turkey was apparently pretty disappointing. I didn't have any, so I wouldn't know, but Anders didn't like it much. I got the breast from a butcher nearby, but I should have known better, because Anders has never really cared for any of the meat I've gotten there. Everything else was delicious though, and we were so happy to be able to have a small Thanksgiving dinner when we couldn't be with our families.
Anyway, I'm hoping to be able to do more baking soon - I've missed it a lot, especially since I haven't been able to do any of my other normal activities like horseback riding and running. And with Christmas coming up, I should have an excellent reason to do so!
Until then, guten Appetit! Continue reading...
October 21, 2009
Zwetschgenknödel or Plum Dumplings
Okay, now I really have been remiss. I've been quasi-busy with school and a bit busier than that with work. I've also been having some bad luck - I recently fell off a horse and hurt my bank and hip, that injury turned into a pinched sciatic nerve, and on Monday I rolled my ankle really badly and have a very bad sprain. But today I did a presentation in my grad level German class and I'm tired and am not planning on doing any work tonight. So here's a post about something I made a while ago. Plum dumplings. They are a traditional German dish (in German: Zwetschgenknödel) that Anders family makes every summer. They can really only be made (and enjoyed) when plums are in season. In Ontario, that means the end of August. Anders and I made them one night shortly before school started.
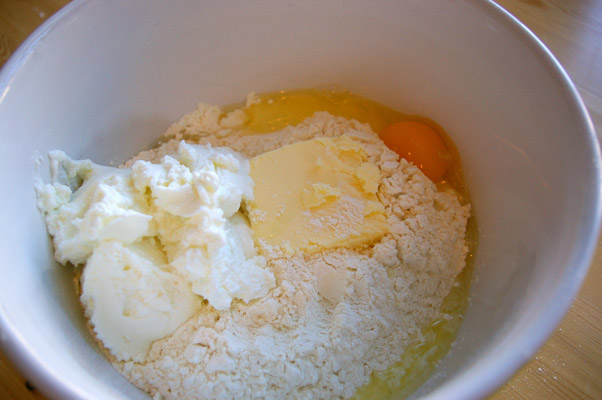
We began by making the dough, which is very simple - flour, eggs, butter and Quark cheese.
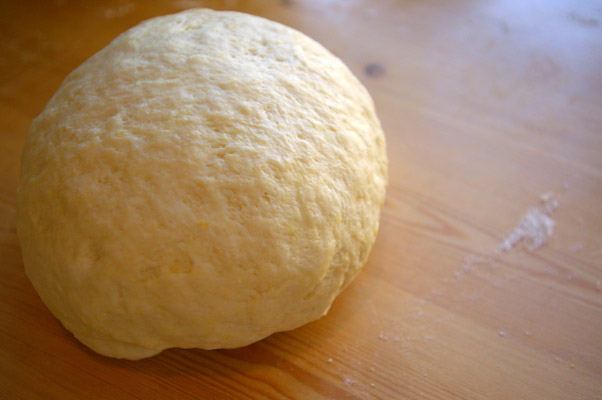
We mixed the ingredients together by hand until they come together into a nice soft, sticky ball. The dough had to be cooled for an hour after that.
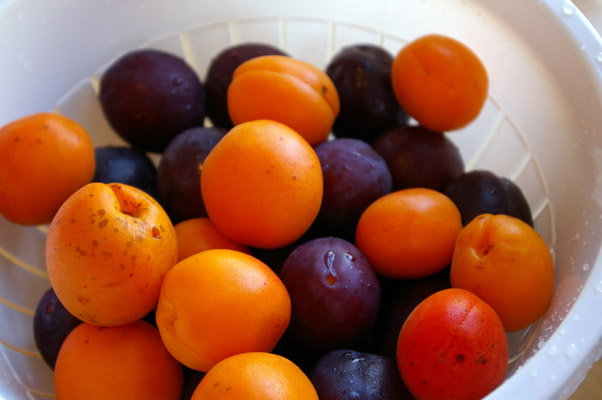
While the dough was in the fridge, we worked on our plums... and our apricots. That's a variation Anders' family loves to do.
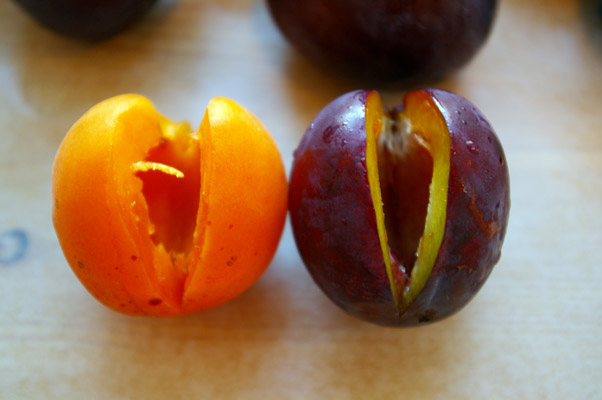
After washing the fruit, we cut a slit down one side and pulled out the stones. You absolutely need freestone fruit for this, or you'll just want to die.
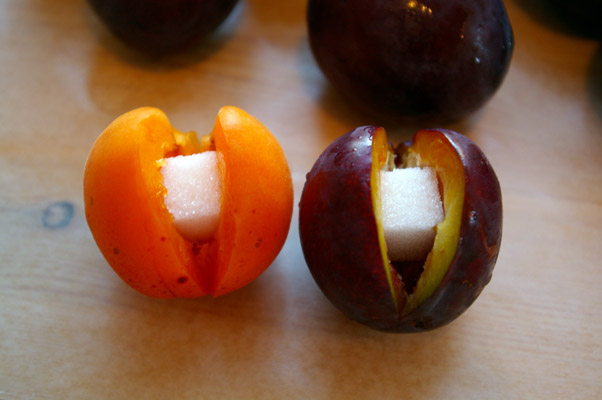
Next, we replaced the stone with a sugar cube.
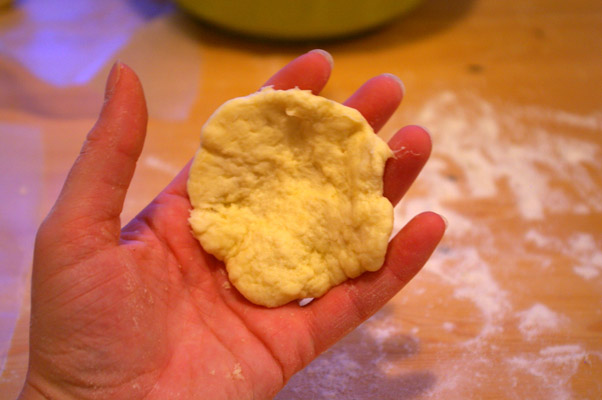
Once we'd replaced all our stones with sugar cubes and our dough was cooled, we tore off small pieces of dough and flattened them out. These we used to cover each plum or apricot.
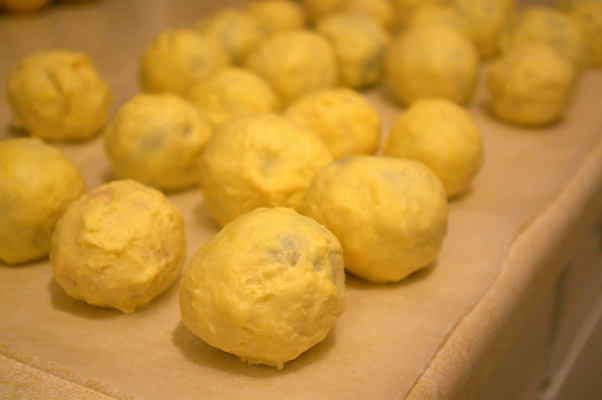
This is trickier than it may seem. The dough is sticky, and the fruit is somewhat wet/juicy. So between the dough sticking to your hands, and the juice from the fruit making the dough wet and not sticky, covering all the fruit takes some time and patience.
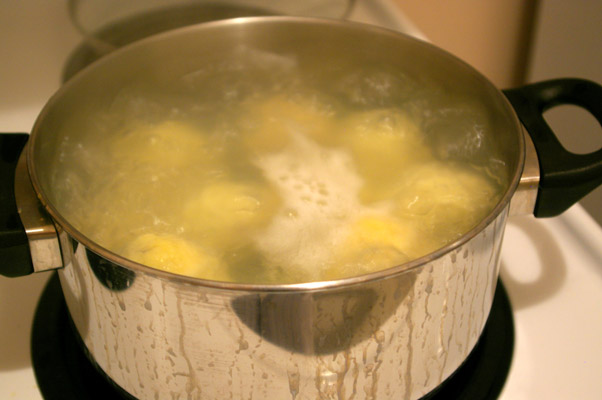
To cook these bad boys, we brought a large pot of water to a boil and dropped them in. The dumplings are finished then they float to the top.

We set the finished ones in a colander to drain.
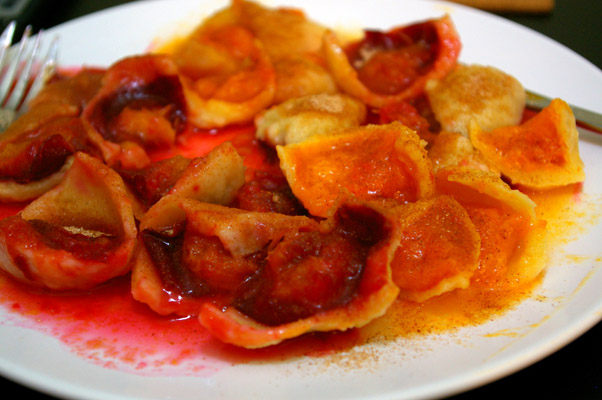
And this is the final and most important step. We each took as many dumplings as we could fit on our plates and in our stomachs, cut them into bite-size pieces and covered them with cinnamon sugar (Anders also put melted butter on his, which is traditional, but I never do it).
And there you have a delicious, traditionally German MAIN COURSE. I'm serious! No one ever believes that this is a main course dish, but it is! Which is not to say that they don't also make a delicious dessert, it's just not traditional.
I have to apologise for not posting this sooner, as plums are definitely out of season in most places (although it is spring in the southern hemisphere...). But it's something to look forward to through the long winter months ahead of us.
Recipe
Zwetschgenknödel or Plum Dumplings
350 grammes flour
1-2 eggs
40 grammes butter
250 grammes Quark
Pinch of salt
50 prune plums
50 sugar cubes
Bowl of sugar
Cinnamon
×××
Mix and knead flower, eggs, butter and Quark thoroughly until smooth. If sticky, use more flour. Cool ball of dough in refrigerator for 1 hour. Meanwhile, wash and dry the plums. Slit plums along one side and replace stones with sugar cubes. When the dough is cool, form it into a thick roll. Cut off small pieces, and knead into flat thin wraps. Wrap each plum in dough.
Drop dumplings into slightly salted boiling water. Simmer for about 10 minutes or until dumplings rise to the surface. Remove gently and place into colander to let the water run off. Serve in a large warm bowl with cinnamon sugar and melted butter on the side.
Guten Appetit! Continue reading...
September 18, 2009
Final Wilton Cake and Truly, Truly, Truly Outrageous Chocolate Cookies

I've been remiss. Well, actually I haven't, I've just been busy. I got a job, the boyfriend moved back in, I started my last year of university (fiiiinally), I started my job, etc. But I've been doing some things in the kitchen and today I'm going to share a chocolate cookie recipe, right after I show you my final cake from the Wilton course.
Oooh, aaah!!
It's not amazing or anything, and my icing wasn't quite stiff enough, so the roses were a little tough to make. Also, I'm really bad at shell borders. Also, the stems of my roses are wiggly. Whatever. The cake itself was very tasty. I adapted my chocolate cake recipe to make it white chocolate, and once I've worked out some kinks in the recipe, I'll be sure to post it!
But here's the recipe for today. Another kind of outrageous chocolate cookie! More outrageous than the last ones, I promise!! These ones are ACTUALLY truly, truly, truly outrageous!

I'll be honest - I did take photos of the whole process for these cookies, but the batter looked like poop and I just can't bring myself to post the photos! I don't want to ruin it for you, because these cookies are super delicious, oh man. They just melt in your mouth and have an intense chocolate flavour. Try them!
Recipe
Truly, Truly, Truly Outrageous Chocolate Cookies
2 ¼ cups flour
½ cup unsweetened cocoa
1 teaspoon baking soda
¾ cup vegetable oil (canola/rapeseed, olive, whatever)
½ cup brown sugar
½ cup white sugar
2 teaspoons vanilla
2 eggs
1 cup chocolate chips
Preheat oven to 375°F. In a large bowl, mix together the flour, cocoa and baking soda. In another bowl, beat together the oil, brown and white sugars and vanilla. Beat in the eggs. Make a well in the dry ingredients, and add the wet ingredients, stirring until combined. Add the chocolate chips and mix to distribute evenly throughout batter. Roll 1/8 cup (2 tablespoons) of batter into balls and place on a cookie sheet. You may press the cookies down if you wish - if not, they will bake into rounded domes. These cookies do not spread. Bake for 8 to 10 minutes. Remove trays to a wire rack to cool for a few minutes before removing cookies from the tray to cool completely.
Makes about 4 dozen.
Guten Appetit! Continue reading...
August 18, 2009
Guacamole and Home-made Flour Tortilla Chips
Once upon a time, I made flour tortillas to use as wraps for a meal I made for myself and Anders. I never posted them because when I rolled them out they turned out to be more pointy and mishapen than circular. But they were tasty. Now, the other day I bought a bag of avocadoes. I don't really like avocado that much, but they're full of healthy fat and nutrients so I decided to just get them and maybe make myself like them. Instead I just went ahead and made guacamole a few days after buying them because that's really the only way I like to eat them. And to eat guacamole you need some chips. But have you ever noticed how much crap is in tortilla chips? Ugh. I have. So I decided to take that recipe for soft tortillas I had made before and make them into chips! That's right, folks. This post is a twofer! Guacamole and tortilla chips ho!
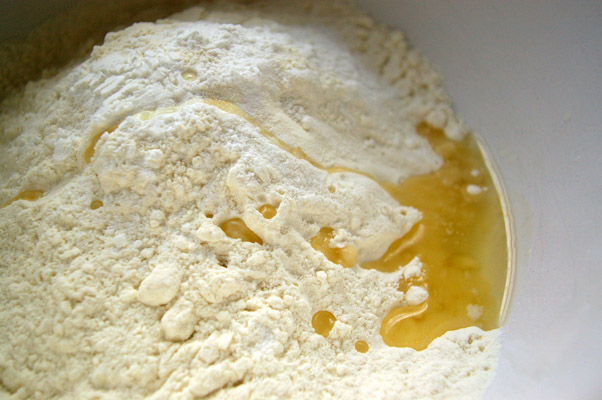
I started with some flour, baking powder, salt and canola oil.

I added some warm milk.

And that's it. Five ingredients, minimal mixing and I got this pleasant lump of dough, which I kneaded until it was well combined and smooth.

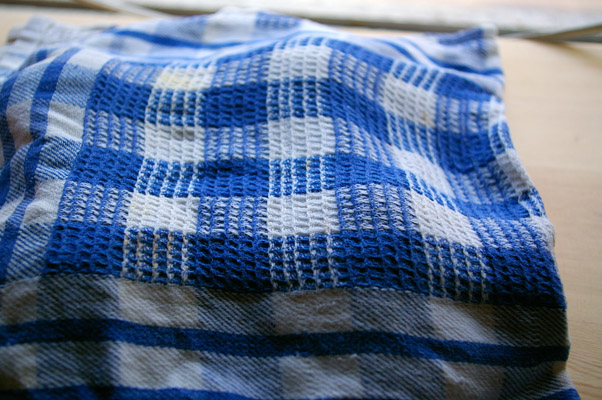
I threw the dough into the bowl I mixed it in and put a damp dish cloth over top. I let it rest for about 20 minutes.
Now, this next part is a lie, because I was multi-tasking the whole time and while the dough was resting I started on the guacamole, but to keep things simple, I'll continue with the tortilla chips.
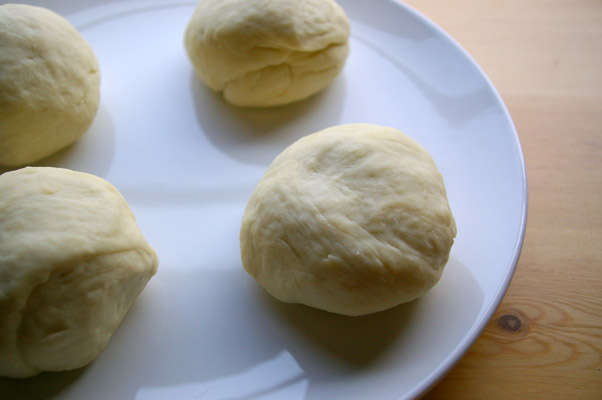
After 20 minutes, I split the dough into four more or less equal parts.
And let them rest again. This dough needs a lot of rest, or it will be tough and gross.
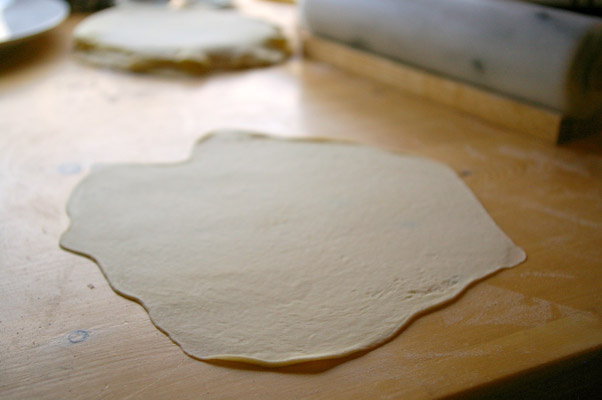
After the second rest, I split each ball of dough in half and I rolled each one out very very thin. They do shrink back up a bit though. I didn't worry to much about how circular they were, because I was just going to butcher them anyway to make the chips.
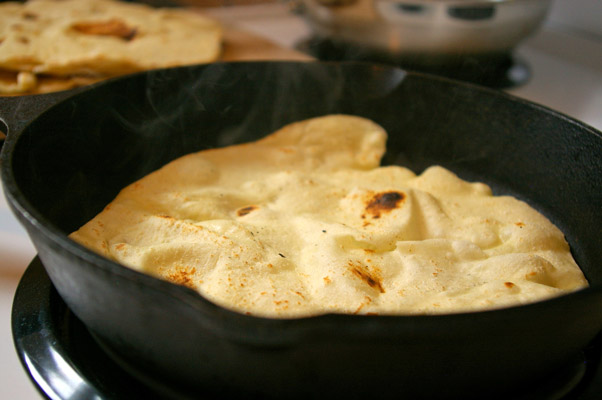
Using my (dry, unoiled) cast iron pan, I...fried, baked?... each tortilla for about 30 seconds per side. They start to puff up a bit and turn brown in spots, so it's easy to tell when they're done.

When they were all done, I cut each tortilla into 8 triangular(ish) pieces.
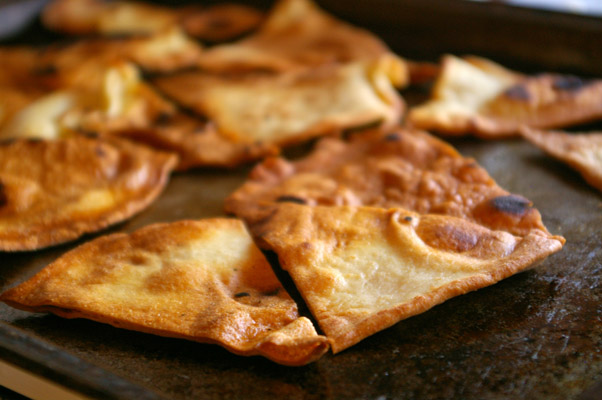
I put those on a baking sheet, which I had first sprayed very lightly with canola oil. I also gave the soon-to-be-chips a light spray. This is what they looked like after baking for about 12 or 13 minutes.
Next, I worked on my guacamole!
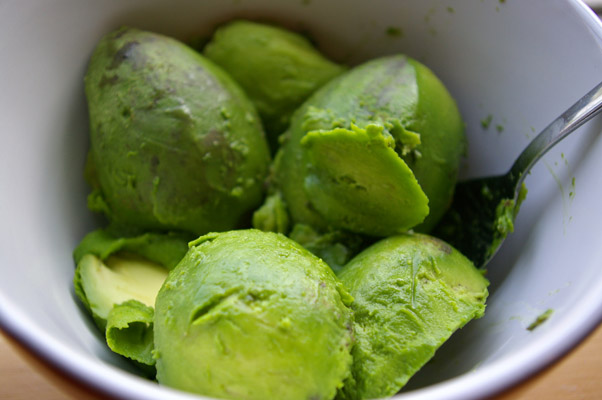
Naturally enough, I started with avocadoes! What a lovely colour!
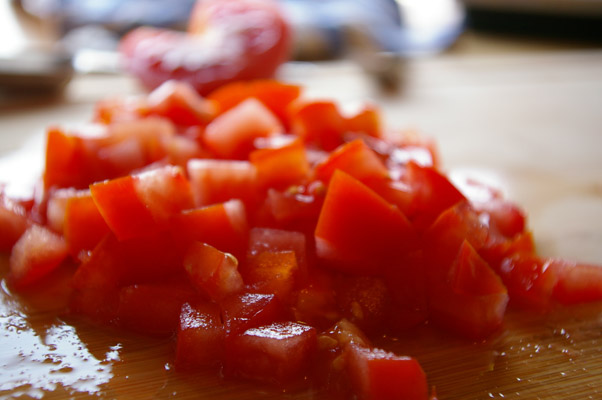
Next, I Chopped up some tomato.
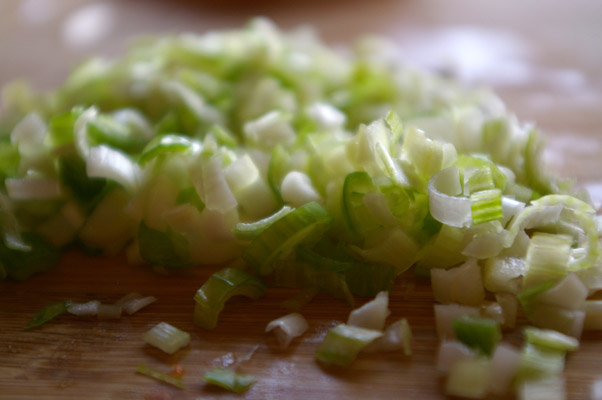
And some green onion.
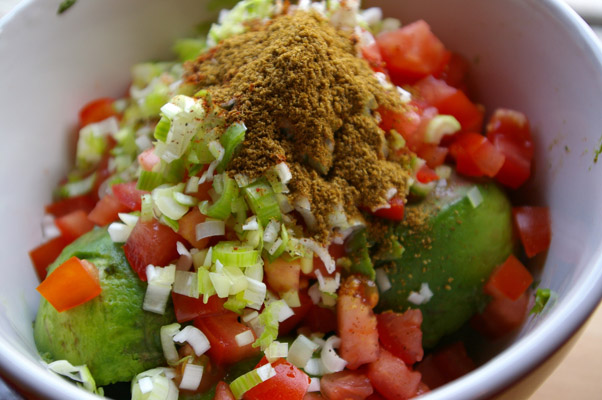
I threw those two things into my bowl with my avocadoes along with some lime juice, chili powder, cumin, salt and pepper.
Now look. I know you're supposed to put cilantro in guacamole. And no, I haven't done that. I have a confession. I hate cilantro. And I know very few people who DO like it so I don't feel bad about it! It makes me feel like my throat is closing up. That isn't a good feeling when you're eating! So I avoid it. I hope you understand.
Anyway... I don't like to mash my avocado before adding the other ingredients. I find that it just turns into paste when you do that and I don't like it. Guacamole should be think and rustic, not smooth and pasty.
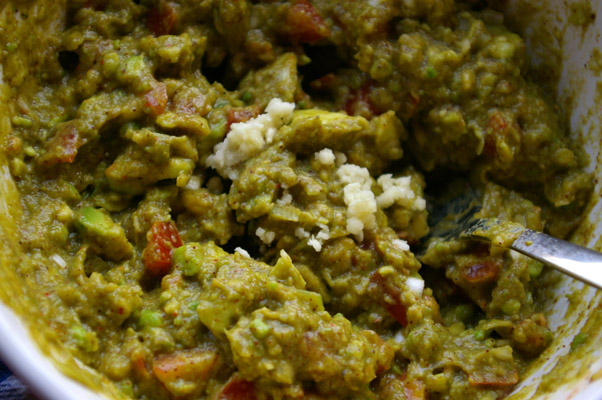
So instead I just take a metal spoon to it and stir, breaking up the avocado as I see fit. And I also add some garlic because I realise I forgot it... and then I don't add enough. Whoops!
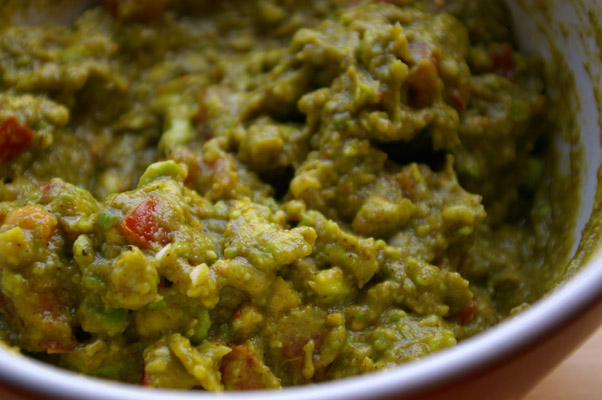
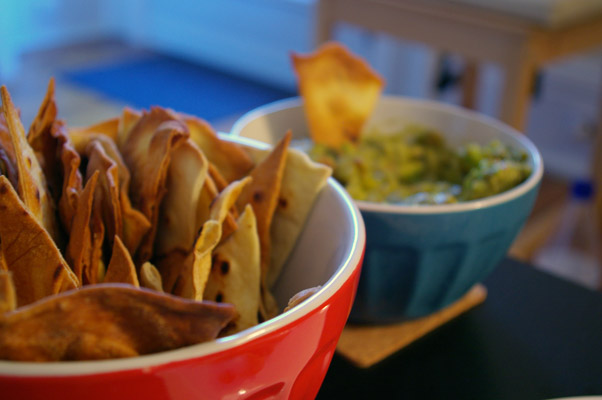
There we go. Oooh, look at it. Tastyyy.
Ooh, both together. Don't you want to just dive into the photo?
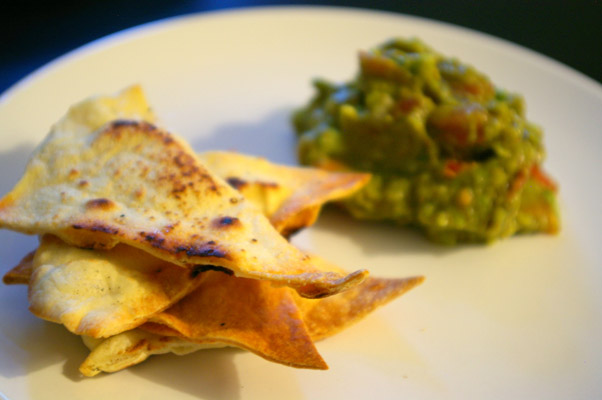
Delicious!
Okay. So I love guacamole. But it's nothing too new or exciting, so let's talk about the tortilla chips. They were good! They weren't WAY too salty like the store-bought ones, they had a nice light flavour and they were just... tasty. My only complaint is that some of them were a bit too crunchy but that was my fault. The only ones that were too crunchy were the darker ones, so they were obviously a bit over-baked. Next time I do this, and I definitely will do this again, I would decrease the baking time slightly. Other than that, they were great! I was pleased to be able to just sort of make it up. I spent a lot of time looking online for a recipe for tortilla chips, but I came up with nothing. Luckily it was easy to simply decide to make these into chips.
Recipes
Flour Tortilla Chips
×××
2 cups of all-purpose flour
1 ½ teaspoons of baking powder
1 teaspoon of salt
2 teaspoons of vegetable oil
¾ cups of warm milk
×××
Mix together the flour, baking powder, salt and oil. Slowly add the warm milk. Stir until a loose, sticky ball is formed. Knead for two minutes on a floured surface. Dough should be firm and soft. Place dough in a bowl and cover with a damp cloth or plastic wrap for 20 minutes.
After the dough has rested, break off eight sections, roll them into balls in your hands, place on a plate (make sure they aren’t touching) and then cover balls with damp cloth or plastic wrap for 10 minutes. After dough has rested, one at a time place a dough ball on a floured surface, pat it out into a four-inch circle, and then roll with a rolling pin from the centre until it’s thin and about eight inches in diameter. Don’t over work the dough, or it’ll be stiff. In a dry iron skillet or comal heated on high, cook the tortilla about thirty seconds on each side. They should start to puff a bit when they're done.
Preheat the oven to 350°F. Cut the cooked tortillas into eighths and arrange a few pieces on a very lightly oiled baking sheet (canola oil spray works well). Spray the tops of the tortilla pieces very lightly with canola oil. Place in the over for 10 to 12 minutes, or until the chips are brown and crispy. Cool slightly before eating.
Guacamole
×××
4 small or 3 medium avocadoes
2 small or 1 large tomato(es), chopped
6-8 green onions, chopped
3 tablespoons lime juice
2 cloves garlic, crushed
2 teaspoons chili powder
2 teaspoons ground cumin
salt and pepper to taste
×××
Cut avocadoes in half and scrap fruit into a bowl. Add chopped tomato and green onion, garlic, chili powder, cumin and salt and pepper. Stir and break up avocado. Serve with tortilla chips or pita bread or something equally delicious.
Guten Appetit! Continue reading...
Subscribe to:
Posts (Atom)
